To connect to an Azure Virtual WAN, you first need to determine how you’re connecting to it—through on-premises, a VPN client, or other Azure VNets. Here’s a summary of the most common ways to connect:
🔌 1. Connect an Azure VNet to Virtual WAN
Use: To connect your Azure Virtual Networks to the hub in the Virtual WAN.
Steps:
- Go to your Virtual WAN → Select the hub.
- Under Connected VNets, click +Add connection.
- Select the VNet, give a name to the connection, and select the appropriate routing intent if needed.
- Enable propagate to default route table if you want this VNet to use Virtual WAN for routing.
🛡️ 2. Site-to-Site (S2S) VPN from On-Premises
Use: To connect your on-premises network (via a VPN device) to Azure through the Virtual WAN.
Steps:
- In your Virtual WAN → go to the VPN site section → click + Add VPN site.
- Provide the site name, IP address of your VPN device, ASN, and address space.
- Associate the site with the Virtual WAN hub.
- Once the site is created, download the VPN configuration and configure your on-premises VPN device accordingly.
👤 3. Point-to-Site (P2S) VPN
Use: To allow individual users (developers, admins, etc.) to connect to Azure via VPN.
Steps:
- In Virtual WAN → Click the User VPN (Point-to-Site) tab in your hub.
- Enable User VPN and configure:
- Authentication type (Azure AD, Radius, or certificates)
- Address pool
- DNS servers (optional)
- Download the VPN client configuration and share with users.
🌐 4. ExpressRoute to Virtual WAN
Use: If you’re using Azure ExpressRoute to connect a private on-prem network to Azure.
Steps:
- In the Virtual WAN hub → click ExpressRoute → + Add connection.
- Provide ExpressRoute circuit details.
- Accept the authorization and associate the circuit with the hub.
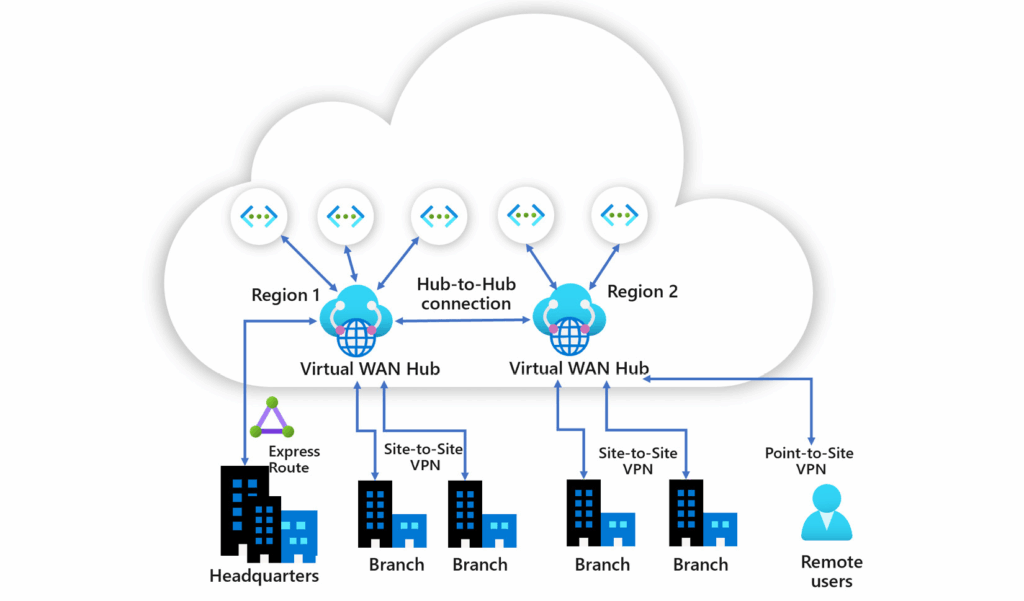
The following figure highlights the example of an organization with two Virtual WAN hubs connecting the spokes.